Discussion. The purpose of this chapter is to examine carefully the assumptions inherent in way the very first fold is made. I suggest that this is a good activity for both the beginning folder and the more experienced folder. After folding over 500 designs over nearly 50 years, I began to realize that nearly every model I designed using a square began with the same type of crease – folding the paper in half with a crease through the center. This was true even when the final design did NOT require a crease through the center. I sometimes used that crease just to find the position I actually wanted. Oh, you could start with just a pinch but still the path (extension) of the pinch would still pass through the center of the square. Further, I would use only 8 distinct starting folds for nearly all my creations. I wanted something new, I wanted to avoid the “Pinch”. How can this be achieved?
We will first examine those 8 possible first folds and how those folds may be defined so they can be duplicated accurately. Towards the end of this chapter, we will explore some alternative “First Folds”. Finally, we will examine how folding a non-square rectangles offers new possibilities for the very “First Fold”.
Let’s first examine how to make and describe one crease through the center of the paper.
Challenge for beginning folders (this is a great review for those with more experience – see how describing a process can enhance your creativity[i])– Fold a square sheet of paper very carefully and precisely in half. Look at the results and then unfold the paper and create a new way to fold the same piece of paper exactly in half. Take a piece of notebook paper and describe in words or drawings exactly how you made each fold. Your description should be complete enough so another person that viewed only your descriptions could repeat precisely the same two starting folds. Do not use any extra materials such as a ruler to make the folds.
Hints for beginners:
Did you describe the position of the paper before the first fold was made fold was made?
Did you change that position to make the second fold?
Did you turn the paper over to make the second fold?
Did you describe the shape that you saw after the fold was made?
Did you draw a picture to show how to make the fold?
Did the picture indicate where position where the crease was made?
Did you use symbols to show the direction of the fold?
Now as a follow-up for advanced folders and beginners alike see if you can come up with some new words to describe each fold you made. How about folding by “diangulation”. Yes, I know, there is no such word – et. Maybe next time you are at a point where you want to change the way a traditional model works you could try “Folding by diangulation” . Let’s see how creative you can get. This may seem a bit frivolous because there are well established methods for diagramming and describing folds. You should definitely be aware of these well established methods. However, each author tends to present these methods in a slightly different manner. As you read more books compare the process used by each author and when you feel inclined, add your own method of description. The purpose of this activity is engender a fresh look at the process and enhance the probability of new creations.
Spoiler Alert
The rest of this chapter will discuss alternative for making and describing how to make the very first fold. Do NOT read on until you have tried the challenge above.
The challenge did not have a picture of the sheet of paper because the position of the paper might have influenced how you decide to fold. This is an important first step in folding. Position the paper so that you can comfortably make the fold. Some might tend to orient the paper like a book with the paper flat on the table in the position of a book. This might lead us to fold the paper by matching the top and bottom edges and the resulting fold would be a 2 by 1 rectangle.

Others might tend to place the paper on a flat surface like a diamond with one corner of the paper pointing towards your body like this.

When describing your fold, position is important. However, do not always accept a starting position of a paper as the absolute truth. You may prefer to slightly turn a paper to make the process of folding more comfortable. You might even prefer to start or finish some folds by lifting the paper in the air.
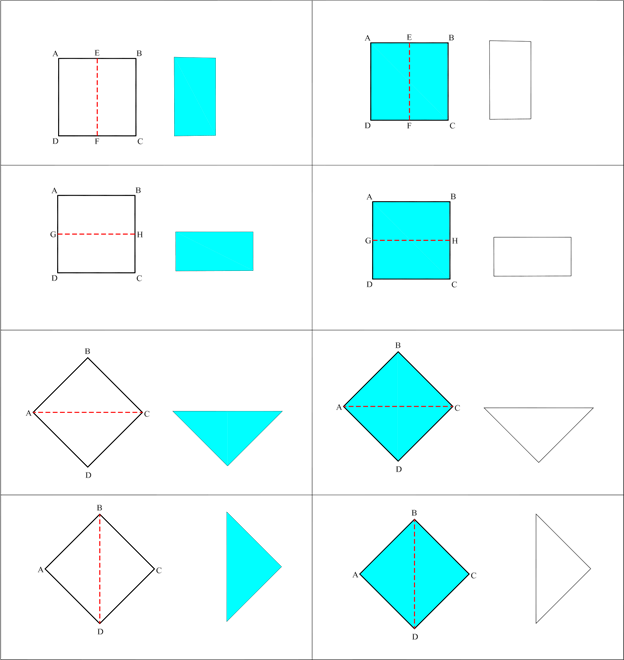
One way to describe a fold is to name the fold base on what the resulting fold looks like.
2Look at the names below each of the folds below. Each has been given a name that has frequently been used to describe how the fold is to be made.
One way to describe a fold is to name the fold base on what the resulting fold looks like.
2Look at the names below each of the folds below. Each has been given a name that has frequently been used to describe how the fold is to be made.
Here are some stranded diagraming symbols used in many books. Note: in the symbols presented below I have used the color Bluet indicate a Mountain Fold and Red to indicate a Valley Fold. Here is a way to remember what each color means - “Blue Ridge Mountains” and “Red River Valley”.
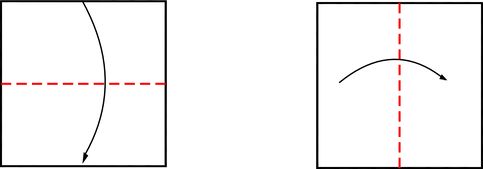
The instruction for the first fold might be as follows:
Curve the paper so line A-D meets and is parallel to Line B-C then Fold Flat creating straight crease E-F.
The instructions for the very last fold might be as follows:
Curve the paper so that Point A meets Point C then fold flat creating a straight crease that passes through points B and D.
A minor challenge:
If carefully designed, a diagram might take the place of these instructions: Of the 4 diagrams below, which two diagrams more accurately portray one of the first simple starting folds?
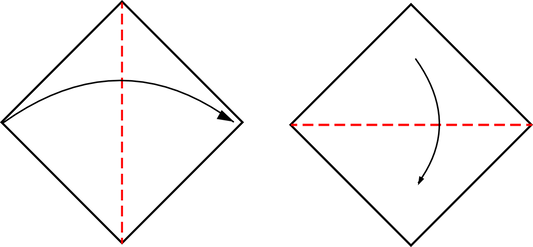
The two diagrams on the left which have the longer arrows are more accurate because the arrow more accurately identifies the position to more the paper to create the desired crease. Remember, you want to fold using guides that are (1) line to line, (2) point to line (3) line to point and (4) point to point. The start and end of the arrows on the right point closer to an undefined space that a point or line. You may notice arrows slightly off target (on purpose) because this makes a better visual display. A diagram is sometimes a compromise between what is visually pleasing (i.e., easier to discriminate parts) and what is most precise.
Lines and points might be labeled with letters in this book when it is deemed that additional information is required. Always notice the starting and ending orientation of the paper. You can vary from this as desired but this was considered as one of the best ways to set up and finish the fold. In addition we will use colors as a guide for certain folds. Blue lines for Mountain folds (think Blue ridge mountains and Red lines for Valley folds(think Red River Valley). The videos provide additional help for folding. Seasoned folders often prefer diagrams and new users may prefer either videos or diagrams. I suggest you look at both so you can transfer similar techniques across different media. Some 3 dimensional folds are best presented in videos. You may need to see a complex fold n progress. Some diagrams can show smaller details that can not be seen clearly in a video. Cut out or x-Ray views are often best done with diagrams.
When folding we need to look outside the box, inside the box and occasionally look “through the Box”. If you start to do this you will be rewarded with new reference points for creating that wonderfully creative new fold.
Here are some other ways to describe the folding process.
Hints for advanced users:
Can you define a new reference and fold a straight line crease by first making a curve?
Can you do this so that others can follow your directions?
See the video – “Making the First Fold” for further discussion
Rolling into thirds?
This brings us to the solution for for the “new starting fold” challenge. I’ll bet a few people thought about rolling the paper into thirds as shown bellow. With practice, this can be done with a fair degree of accuracy
When folding we need to look outside the box, inside the box and occasionally look “through the Box”. If you start to do this you will be rewarded with new reference points for creating that wonderfully creative new fold.
Here are some other ways to describe the folding process.
- Fold an Angle Bisector = When two reference lines cross you can often match the two lines folding a crease that passes through the point where the lines cross and divides the angle formed into equal parts (Same number of degrees).
- Fold a “Pinch and Stretch line” = Use two defined points on a paper such as the corners, pinch each point in opposite hands and pull a straight crease between the points. You might need to see this one done on the video.
- Squash Folds = Using an existing folded edge and another crease line or edge, lift the paper away from the table to a vertical position. Next push your finger or a small object in between the layers and press down on the folded edge while spreading the layers apart. That’s probably another fold that is best viewed n the video.
Hints for advanced users:
Can you define a new reference and fold a straight line crease by first making a curve?
Can you do this so that others can follow your directions?
See the video – “Making the First Fold” for further discussion
Rolling into thirds?
This brings us to the solution for for the “new starting fold” challenge. I’ll bet a few people thought about rolling the paper into thirds as shown bellow. With practice, this can be done with a fair degree of accuracy
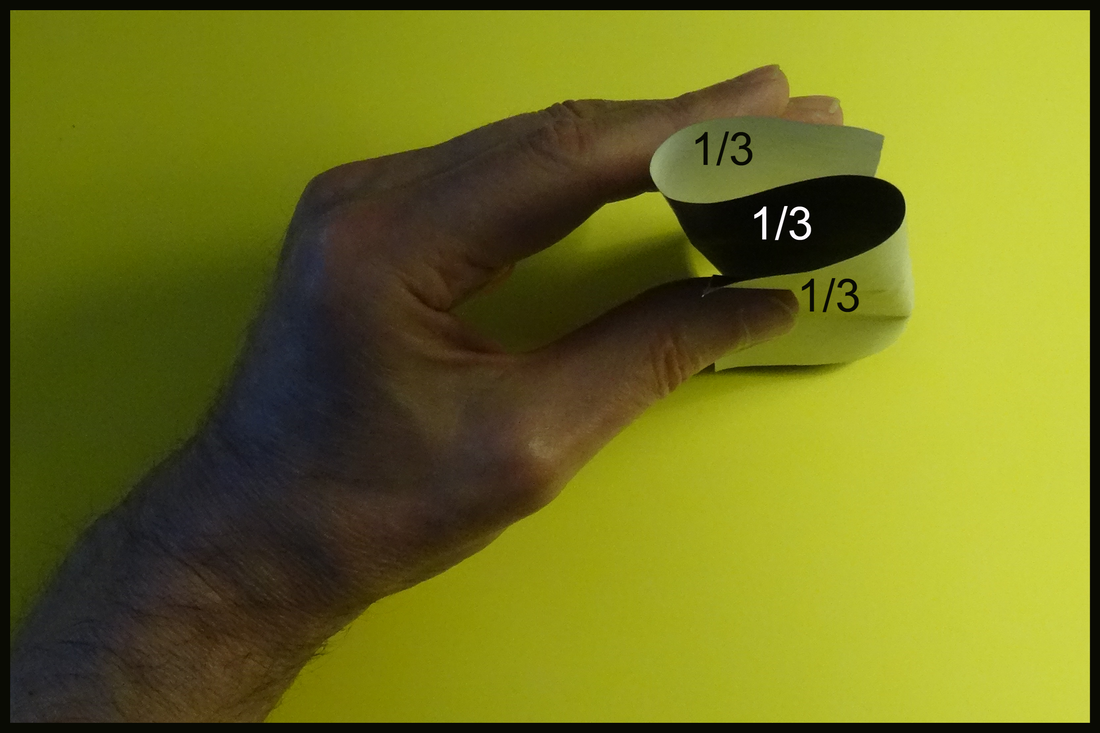
However, I am making a judgement call and saying this is NOT a satisfactory solution to the challenge. The problem is the degree of accuracy can not be established until a fold is made because there is no absolute reference point. If this were a valid method then you could theoretically roll a paper by visual inspection to any number of equal parts. Now just try dividing a paper into sevenths by visual inspection of rolls and see how practical or reproducible this method is.
Cone curve to straight crease!
Some might argue that the method I will outline also requires that making of a fold to test reality. However, I maintain that there is a logical way to establish a new reference point without making even a pinch. Here is the essence of the fold. Roll the paper so that opposite ends of the top edge of the paper meet. Keep the points together and swing the points downward forming a cone shape with the point between the top two corners forming the new reference point. Since the junction of the two lines forming the cone must be exactly ½ or the top edge, a new reference point is accurately established. Now fold a line from this new reference point to a lower corner and you will have a straight line that does NOT pass through the center of the paper. This is a tough one to visualize so take a look at the pictures below and then look at the video on the DVD.
Folding with rectangles that are NOT square.
So far we have been making folds on a square. I talked about the 8 EASY folds you can use on a square. Now let’s look at a rectangle that is NOT a square. Can you think of what apparent advantage there is to working with rectangles that are NOT square? Well, here is an important one. There quite a few more easy to define methods for the first starting folds.
So far we have been making folds on a square. I talked about the 8 EASY folds you can use on a square. Now let’s look at a rectangle that is NOT a square. Can you think of what apparent advantage there is to working with rectangles that are NOT square? Well, here is an important one. There quite a few more easy to define methods for the first starting folds.
Easy Challenge. See if you can find at least 16 easy to define single straight line creases for a non-square rectangle. Here is a hint and yet another challenge. The rectangle below is about the same proportion as a letter size sheet of paper. Look at all the creases shown. The endpoints of all lines are defined by letters. Some of the lines are easy to fold “First Folds” for this rectangle. Some are not.
Look at the definitions below and see which definitions go with each crease. List the lines that match each definition. Some definitions and/or crease will be used more than once. Even though the word used is “creases”, there may be only one matching crease for some definition
Definitiond Lines that match this definition
Angle Bisector formed by 2 edges of the paper or other lines ___________________________
These creases cross the center of the paper D-I and A-F (example answer)
These creases cross the midpoint of an edge of the paper. ___________________________
These creases divide the paper into two equal areas ____________________________
These creases pass through two corners of the rectangle ____________________________
These creases are probably NOT used as a first fold ____________________________
These creases are parallel to one edge _____________________________
You might need to use the pinch and stretch method to ____________________________
make these creases.

Chapter Two – Base to Face
The final outcome of this chapter will be to show how traditional bases used with squares can be applied to rectangles that are not square. We will see how placement and extension of these simple bases leads to a great variety of alternatives for the creative process.
This chapter will begin by folding four very simple folds on a square, Two Mountain folds and two valley folds. We will see how these same four folds can be become two different traditional origami bases, the “preliminary base” and the “bomb base”. We will explore a number of alternative was to fold these bases.

In making these folds we will look at reference points in the following manner:
Next we will explore folding the traditional “Fish” Base using the often used technique called a “Rabbit Ear”. We will see alternative was of folding the Rabbit ear with a challenge to make this fold without additional creases. We will see different ways of using a Rabbit ear on a rectangle
Next we will see how many ways simple folds and bases can be applied and extended when folding with rectangles. We will then see how to apply these bases to rectangles using these alternative methods:
- Point to Point
- Line to Line
- Line to Point
- Point t Line
Next we will explore folding the traditional “Fish” Base using the often used technique called a “Rabbit Ear”. We will see alternative was of folding the Rabbit ear with a challenge to make this fold without additional creases. We will see different ways of using a Rabbit ear on a rectangle
Next we will see how many ways simple folds and bases can be applied and extended when folding with rectangles. We will then see how to apply these bases to rectangles using these alternative methods:


Step 1 – Creating two different bases from just four folds
The diagrams below show how to fold the Preliminary Base (shown on the left side) and the Bomb Base (shown on the right side).
The following folds are used to make the Preliminary Base
The diagrams below show how to fold the Preliminary Base (shown on the left side) and the Bomb Base (shown on the right side).
The following folds are used to make the Preliminary Base
- Make two Mountain Folds on the diagonals (line A-E and line C-G)
- Make two Valle Folds that are parallel to the edges (lines B-f and line D-H)